Instructions for de-bloating a Windows Install
Instructions for a minimal Windows Install
Download Windows 10 Pro from https://www.microsoft.com/en-gb/software-download/windows10
It is not recommended to download any enterprise versions or pirated software as they normally come with code injections and viruses that can spy on you and cause problems and is actually totally unnecessary seen as the bulk functions of Windows 10 can run without a license and with this guide you will be able to customize Windows 10 and optimize it to your liking.
Using a tool called in win toolkit we will modify the ISO image files.
Alternatively you can use NT Lite, however, they now charge a subscription fee.
1. Download all tools you are going to be using.
7Zip
Official Windows 10 ISO
Win toolkit – majorgeeks.com
2. When downloading the Windows 10, click the download tool now then click download ISO, not USB
3. Extract win toolkit using 7Zip
4 You need to extract the ISO using 7Zip directly in the downloads folder – what it does is, it extracts the full ISO into the folder where we can modify it and thereafter compress the customized version
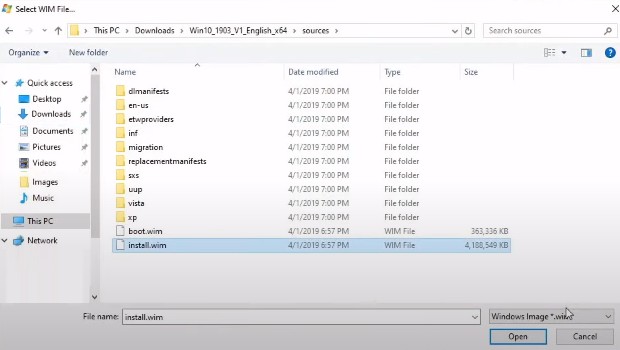
5. Under the Windows extracted file go to the sources folder and under that folder
6. Now we have the install.wim, if you have the esd you need to run a power shell command below in red to convert the install.esd to install.wim
DISM /Get-WimInfo /wimfile:install.esd
Note: Look for the windows version you want eg Pro and then write the number down
DISM /export-image /sourceimagefile:install.esd /sourceindex:1 /destinationimagefile:install.wim
Note: Look at the /sourceindex trigger, you need to change this number to the version of windows you found from the first command.
7. Open Windows toolkit select the all in one integrator and click on browse for the wim file, then navigate your extracted downloaded folder, go to sources folder and then select install.wim

Select All in One Integrator
Browse for the wim file
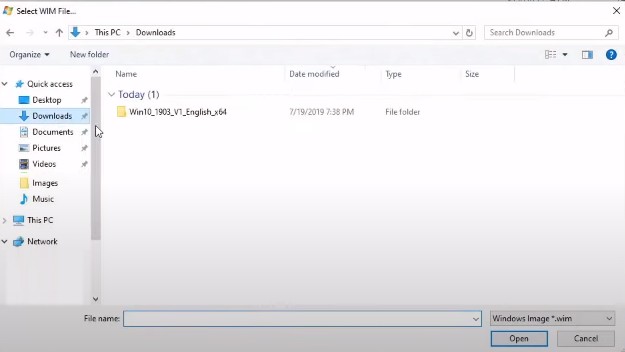
Select the Win10 Folder
Then Sources
Next click on install.wim
After you have installed the following screen is what you will see

Here you can choose whichever IOS you want to use. In this instance we are going to use Windows 10 Pro
Select Windows 10 Pro and click on Other Tools
Then click on Component Removal
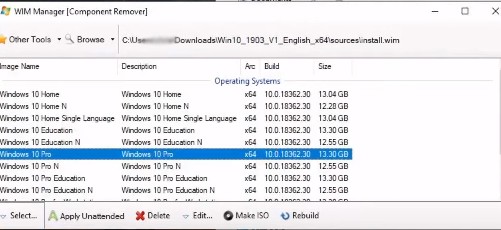
Next we click on “Select”
Thereafter the following screen will open
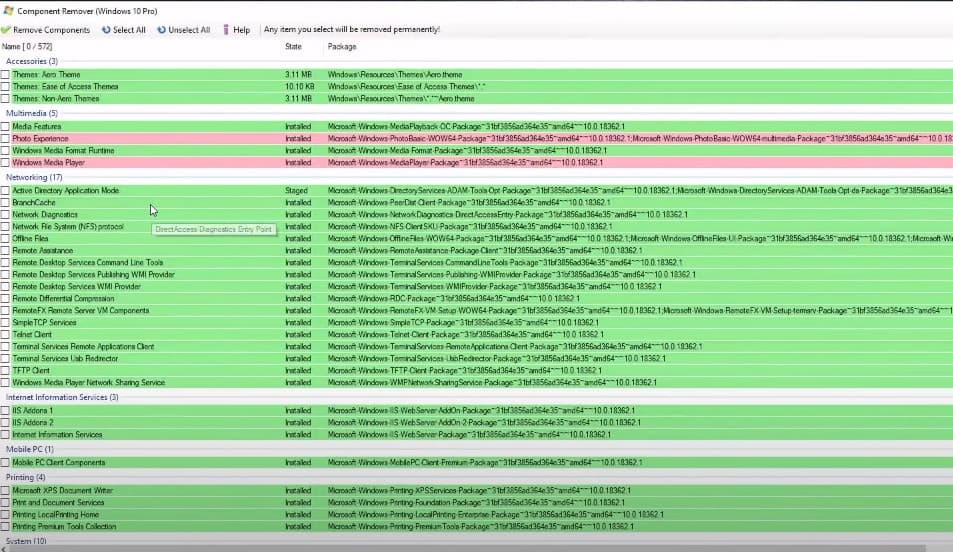
Just a note if it is your first time customizing Windows 10, leave in everything that is in red. DO NOT remove any of the red highlighted ones.
You can leave Accessories and Multi Media in
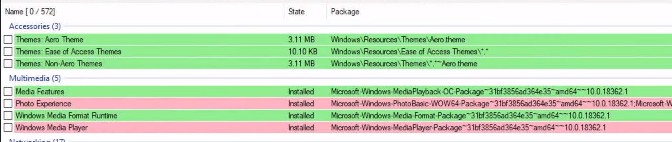
Under Networking you can check most of the check boxes as most of them are not needed.
Next you have Internet Information Services – those can be left in
Next “Mobile PC” can be removed
Under Printing, if you have a printer installed you can leave in “Print and Document Services”, the rest can be removed.
Under System you can check all the boxes – it is recommended that you leave the HTML Engine
You can also leave in .NET Framework 3.5.1
Of course at this stage your are able to customize the IOS to your liking. However if it is your fist time removing components we advise that you be very careful as to what you remove.
Windows search allows you to search your computer, but it does use a lot of resources, so this is completely up to you to leave it in or remove it.
Internet Explorer is another one that we will leave up to you. If you choose to remove it, it can cause some problems later on as there are still sites that use Internet Explorer.
Virtual PC – can be removed
Windows Media Player Troubleshooters – can be removed
Under Unknown
All the Check Boxes that are in white – those should be left in as they are unknown to the toolkit editor and you might end up removing something you really should not be removing
Under Windows Set up
You can check “Delete “Support Folder” and remove that
Updates.
No need to remove that, if you do it will anyway just download the update.
After checking all the boxes that you wish to remove you can go ahead and click on “Remove Components”
If you have removed Windows Defender, you can just install the Antivirus you would have. So no need for Windows Defender.
If you have removed Windows Search, a nifty little program that can be used in it’s place is called “Everything”
After you have done your initial removal and you notice that there are still a few things you would want to remove, you are able to go and check whatever else you would want to remove and then remove any additionals.
Please remember if you remove something you will not be able to re-add it.
Eg. We are going to go ahead and remove Windows Cortana, Windows Hello Face, Windows Hello Face Legacy Resources and Windows Defender Application as well.
Remember that removing some of the systems above does affect functionality. For instance Cortana the welcome screen the login screen
So just note that if you are going to be removing big system files there will be some side affects that you will have to work around
Once you are completely done with removing everything you want you can go ahead and close the windows component remover.
Next you will see a screen like this

You can then go ahead and click on Save and Rebuild
Before we do the install there are a couple of things you can do. This is however additional.
So if you go to the Intermediate Tap
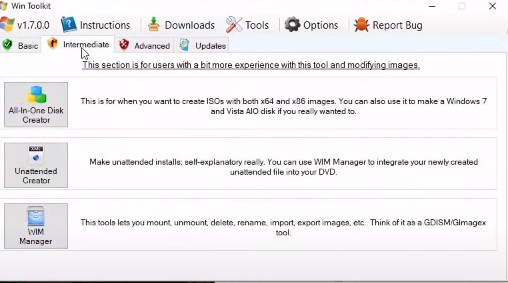
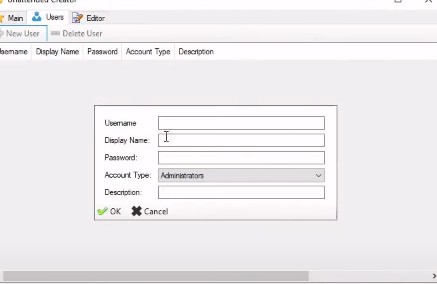
You can make an Unattended Creator which is really nice as it creates accounts
Here you can create an auto log in, set an admin password
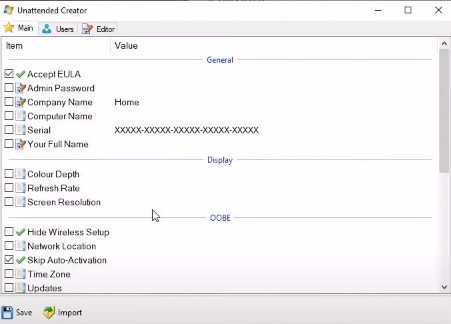
Here you will set up as much as you can
Next you can go to the “Users” Tab
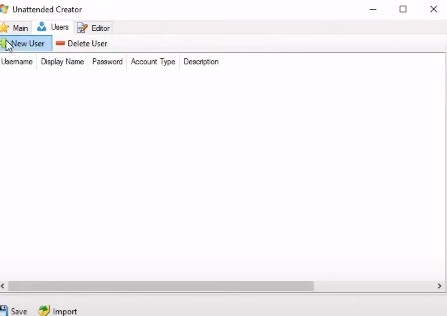
Here you can create a user
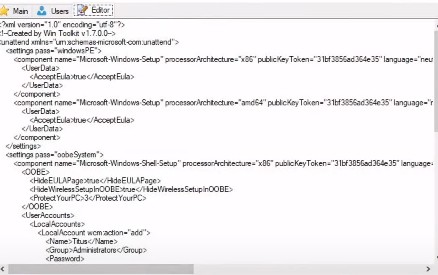
If you are familiar with XML editing – you can do even more stuff over in the “Editor” Tab
Click save
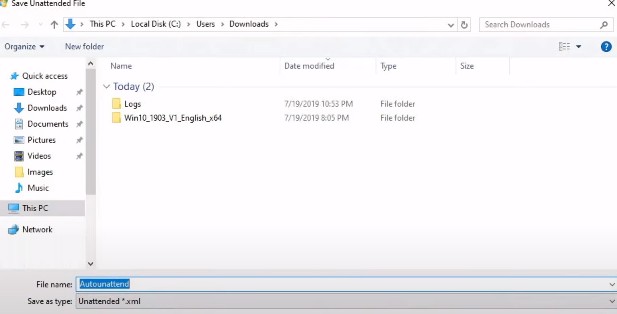
You can then go ahead and save it to your downloads
Next you will see the following screen
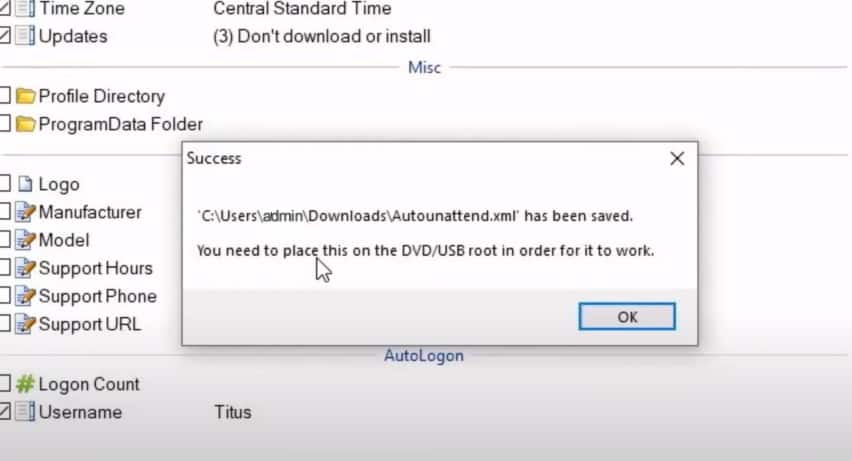
Click Okay
To make the IOS file you need to select the folder and from the folder select the ISO output
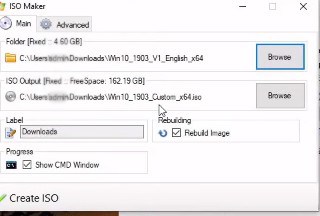
Go ahead and click on create ISO
Click Yes
After the process you might notice a slight size increase, this is mainly because we ripped out so many things and it cannot compress it the same way again as Microsoft, so it might not be as tight and therefore you might notice a slight size increase.
After this you will go ahead and then burn the ISO File
You can use Rufus for this
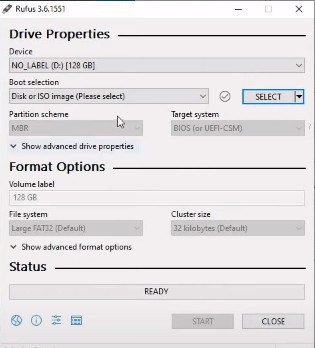
Select ISO File the custom version
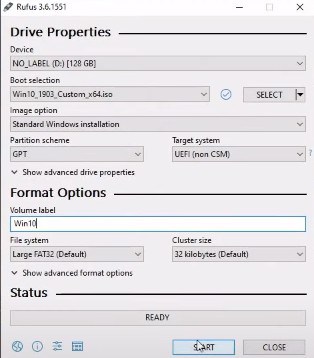
Label it and then go ahead and hit START
By File System if you see FAT, you probably should switch to NTFS
When using NTFS remember to disable secure boot as it is not compatible with NTFS
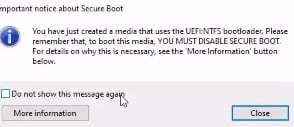
If you are not running secure boot you can just go ahead and close the above screen
You can then go ahead and close Rufus as well
Next go copy Autounattended and take it over to the Win10 Drive

And Paste
This is where you put it in the root and from here you are good to go.
Restart the computer and select boot Menu (F11)
Boot from USB/Disk whichever you used
Once installed go ahead an restart
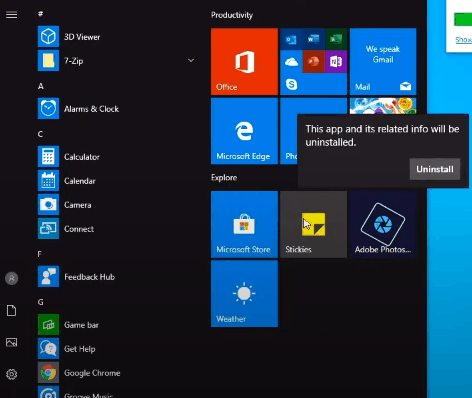
You can then go ahead and uninstall Edge
You can also go ahead an unpin everything from the task bar
You can then go to Ninite Install where you can choose your normal apps you like using
While apps are being installed in the background you can go ahead and as can be seen above there are still some programs that just bloats windows so you can go ahead and uninstall these
After this you will find there are still a lot of unwanted stuff and you can use a de-bloat script
After doing the de-bloat script we will go ahead and do O&O Shut up
We can run through that in the next couple of steps
Go ahead and launch Chrome
In the search bar type in: https://github.com/Sycnex/Windows10Debloater
Then download the de-bloat script
Extract to downloads
Launch Power Shell
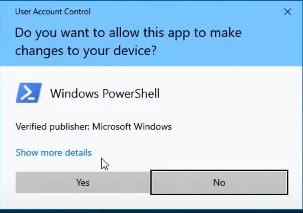
Click on Show more details
Then, change when these notifications appear
Drag it right down to never notify, make system insecure
If you are a person that likes to click a bunch of ads and browse the internet don’t do the above
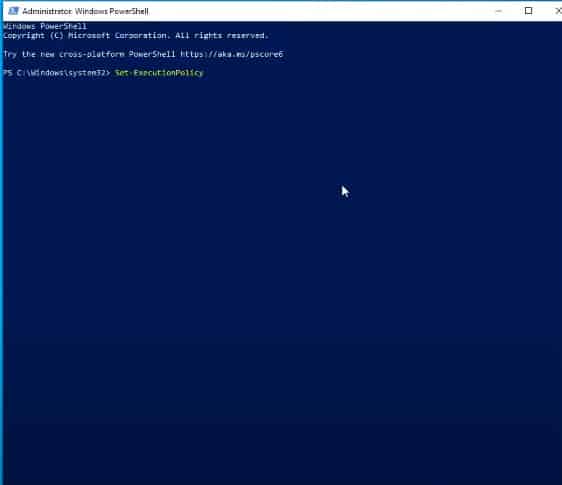
Launch Windows PowerShell again
Next you will go ahead and set your Execution Policy to unrestricted
Click Enter

Run a LS
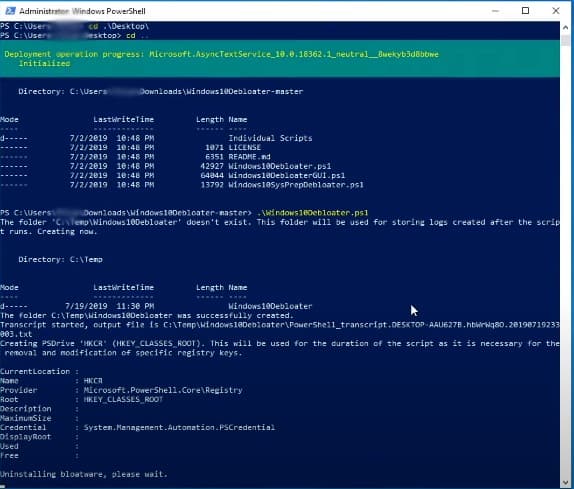
And then run the Windows 10 De-bloater
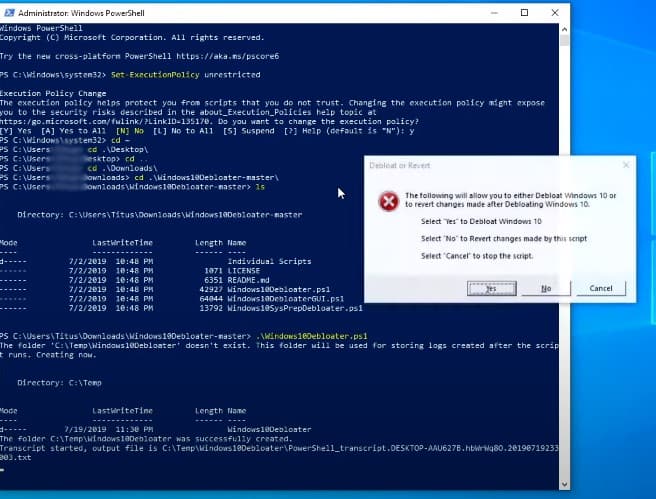
Click on yes to De-bloat now
Click yes to remove all
As Microsoft is continually running stuff and updating stuff you will need to download and run this again, probably in about 6 months or so to keep a clean system
The de-bloater will get rid of most of Windows’s integrated stuff
After the de-bloater has done it’s thing you can say yes
Yes to stopping Edge from taking over as the PDF viewer
Click Yes
Yes to unpinning everything from the start menu
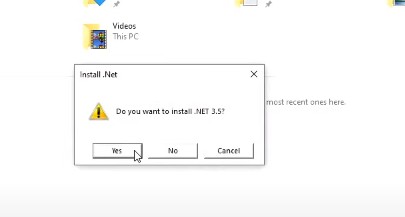
Yes to install NET 3.5
Don’t reboot just yet
Now you have de-bloated it using the script
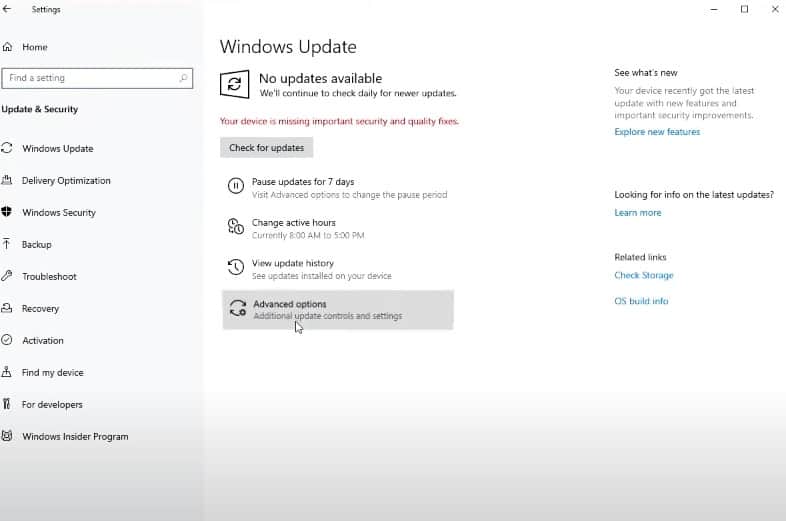
Next we will look at some settings
Go to Updates
Then Advanced Options
Choose future updates
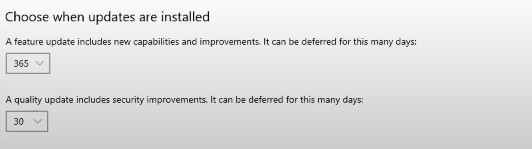
Delaying is nice because the update comes up, you don’t immediately get it, it has time to work through all those other people that didn’t do these settings. Most of the stuff does not have the quality assurance and messes up a lot of computers.
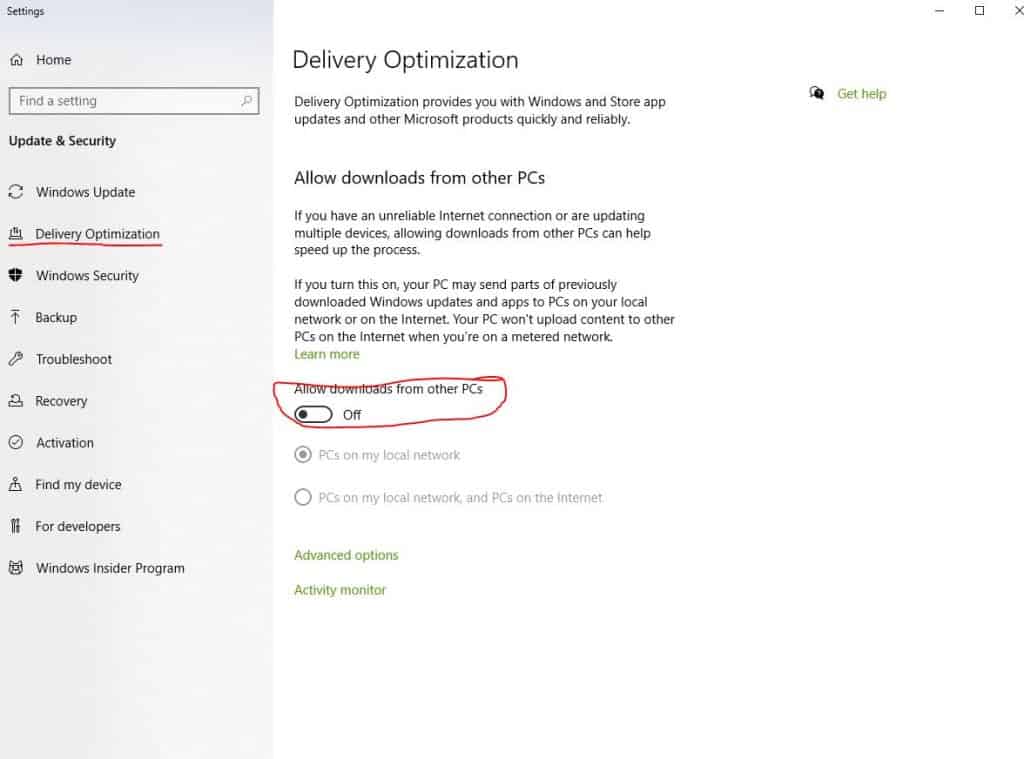
Next click on Delivery Optimization
Switch off “Allow downloads from other PCs”
Next you want to download O&O shutup from MajorGeeks.com
Apply all the recommended updates
You can add some more by clicking on the “Actions” Tab

Then click on “Recommended and somewhat recommended settings
Switch on “prohibit apps from running in the background
Disable Smart Screen Filter
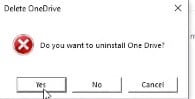
Disable Microsoft OneDrive
Disable Windows Defender
Then go File – Exit – Yes
And then restart
Once you have restarted your machine you will have the usual things you need to set to default as per a usual Windows install
And there you have it, you now have a minimal Windows 10 minus a whole bunch of stuff that is not needed.